Studying game polishing
Catching Up
If you came from social media you can skip this section.
Last month, someone sent me a twitter video by André Cardoso where he made 3 simple gameplay demos, then polished them with common techniques like impact feedback, screen shake, bloom, lerping, etc. Sometime later, bored, I decided to replicate the Top-Down combat part of his video, applying all the techniques. This is not my first study on juice and polish, but as you can see below, it’s probably my best so far.
Tried my hands at implementing the tips here in Godot and I'm very proud of the results! Solid stuff! #godot #gamedev
— Natan Maia (@natanmaia95.bsky.social) November 2, 2025 at 9:42 PM
[image or embed]
The original video is there as well, you should watch it too, it breaks down the effects used, and is generally awesome.
So, I also shared it on both Reddit and X.com, and… for my usual numbers, it blew up.
Lots of people asking for tutorials and open sourcing the code. I don’t feel too comfortable sharing the whole project because it uses some systems I’ve made which aren’t finished and I don’t wanna polish / maintain, but I still wanna help somehow (and talking about dev is fun), so here’s a breakdown of everything I did.
Why not a Tutorial?
This article is already an estimated 20 minute read.
There’s just too many features going on at once. I personally googled a bunch of tutorials for all the things I added, so I believe it’s best I link you those tutorials then explain my though process behind my decisions.
This wasn’t particularly fast to code either so don’t worry if it takes a week or two to implement everything, especially if you don’t have some systems already on hand for every project, like hitboxes, sound players, enemy spawners.
Core Combat
If you don’t have a combat system already, this one by Queble is very similar to mine (by coincidence!).
The important detail I want to add is you want to fire lots of events throughout your damage pipeline, so you can hook into those for your effects. They can be signals or manual function calls.
Here’s a non comprehensive list of the signals I fire in my project:
- When a character enters the scene (for spawn particles?)
- When hitbox connects with a hurtbox and is valid for damage (inside hitbox, to play effects)
- When a character’s health changes / decreases (in a larger game make sure you can differentiate damage from healing)
- When a character’s health hits 0 for the first time (so, when it dies)
Then those signals are connected to scripts to spawn particles and play animations as needed.
I also manually call some functions because I haven’t modularized those systems yet, and maybe they don’t even need to. My hurtbox calls the combat character’s receive_hit(hit_data) function, where hit_data holds damage and knockback power, as well as references to the attacker and defender and their hit-hurt-boxes.
# CombatCharacter
func receive_hit(hit_data) -> void:
    var knockback_component = get_node("KnockbackComponent")
    if knockback_component:
        knockback_component.apply_knockback(hit_data)

    var stagger_component = get_node("StaggerComponent")
    if stagger_component:
        stagger_component.apply_stagger(hit_data)

    if hit_data.damage > 0:
        self.apply_damage(hit_data) #this has a setter that fires health_decreased signal
This is not modular, but works.
Personally, as my games are smaller, I don’t like making things as velocity, health, knockback etc separate Component scripts because I don’t like how type hints (don’t) work well with get_node or get_children. I prefer it for things that are used by very few entities and can be interacted solely through state machines, like a PathfindingComponent. I’ll probably change the two components above and add them to the base combat character class.
If you need further reading on damage pipelines, check this video by Gab on FairFight channel. The pipeline here is very complex for a jam game but if you’re making a roguelike or soulslike you might need it. It’s also a series of videos so I recommend his entire channel.
Player Animation
If I were replicating the original video’s animation I’d likely just use tweens. Tweens execute actions linearly way past the original function call so it’s great for animating via code. Here’s how that could go:
# Player
func attack() -> void:
    # control variable if there's no state machine
    if attacking: return
    var attacking = true

    var tween_attack = create_tween().set_ease(Tween.EASE_OUT).set_trans(Tween.TRANS_CUBIC)
    tween_attack.tween_property(hitbox, "disabled", false, 0.0) # turn on hitbox
    tween_attack.tween_property(sword_trail, "visible", true, 0.0) # turn on hitbox

    # there's probably better ways to rotate the sword via tweens, don't assume this works.
    tween_attack.tween_property(sword_hilt, "rotation_degrees:y", 10.0, 0.0) # reset pos
    tween_attack.tween_property(sword_hilt, "rotation_degrees:y", 170.0, 0.3) # destination pos, 0.3 secs later

    tween_attack.tween_property(sword_trail, "visible", false, 0.0) # turn on hitbox
    tween_attack.tween_property(hitbox, "disabled", true, 0.0) # turn off hitbox
    tween_attack.tween_property(self, "attacking", false, 0.0)
Tweens are awesome, I love how snappy animation via code can be, but I was trying something more akin to the 3D animation pipeline with bones instead of interpolating angles like I’m used to in 2D, so I didn’t use that for the player. So let’s take a look at those.
Attack animations need to be snappy, going fast in, slow out, so the player gets immediate feedback from their attacks and feels more in control. Of course, stronger, slower attacks should probably have more wind-up to match; I still think Monster Hunter is the best at this.
I have two animation players, a ModelAnimationPlayer and a BackendAnimationPlayer, inspired by FairFight from earlier. This assumes my model’s animations will be imbued into the 3D model I’ll be using and thus I can’t add anything onto it, so I need another animator for turning hitboxes on and off, triggering sound and particle events. I’d even argue separating the flags and the visuals into different animators but then you’d have 3 animators which sounds like a headache…
This project always calls both animation players simultaneously when starting an animation, I manually call play on both with the same anim name. By the way, you can set a blend_factor when playing an animation so the 3D transforms transition smoothly from the earlier animation, but you should only do this on the visual animator. When doing this on a track that had function calls for sound effects, I was hearing 1-4 sound events per frame with sound.
Enemy Hit Feedback
I did use tweens for the enemy hit though. The original video shows the enemy characters bobbing backwards, stretching a bit, and glowing red hot. I couldn’t replicate the stretching but I’m satisfied with the rest.
For this effect in specific I made a separate script that listens to the enemy’s damage taken signal, but it could’ve been on the enemy script. The reason is because the material setup is janky and if I made multiple enemies they’d need changes. Here’s the whole script:
# ListenerCharacterDamageAnimation
extends Node
@export var character : CombatCharacter3D
@export var model : Node3D
@export var material : BaseMaterial3D

var interval := 0.2

var movement_tween = Tween
var material_tween = Tween

func _ready() -> void:
	character.health_changed.connect(_on_character_health_changed)

func _on_character_health_changed(_new_amount:float, delta:float) -> void: # change to your signal shape accordingly
	if delta > 0: return # do nothing on health gained
	movement_tween = create_tween().set_ease(Tween.EASE_IN).set_trans(Tween.TRANS_QUAD)
	movement_tween.tween_property(model, "rotation_degrees:x", 45.0, 0.1)
	movement_tween.tween_property(model, "rotation_degrees:x", 0.0, interval)

	material_tween = create_tween().set_ease(Tween.EASE_IN).set_trans(Tween.TRANS_CUBIC)
	material_tween.tween_property(material, "albedo_color", Color(4.0,0.8,0.1,1.0), 0.0) # note how the red channel goes past 1.0
	material_tween.tween_property(material, "albedo_color", Color.TRANSPARENT, interval + 0.2)
The model property is just the root node of your 3D model. This assumes the model is facing towards negative Z with rotation 0 on all axes. This also assumes the origin is at its feet so it rotates back instead of rotating in place. You might need to adjust these. You can also make the model node be an empty Node3D in which your actual model resides (I recommend it).
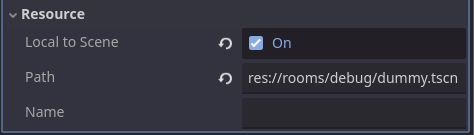
The material links to a Material Overlay (not Material Override!!!!) that’s added to all the relevant meshes. It needs to be shared between meshes in each enemy, but not shared between enemies. To achieve that, make a new material, add it to the model (in Material Overlay), then edit it, go to Resource > Local to Scene, turn that ON. Now, to assign that material to other meshes and to the damage Node you’ll go to the material, right click > Copy, then paste that on the other export fields. The material itself is all standard except for:
- Transparency > Transparency: Alpha
- Albedo > Albedo Color: make it start as Transparent
- Shading > Shading Mode: Unshaded
The script will then modify this material’s color to be orange, then back to transparent. I don’t think this is the best way to do this sort of hit flash in 3D from all the setup involved but, again, it works.
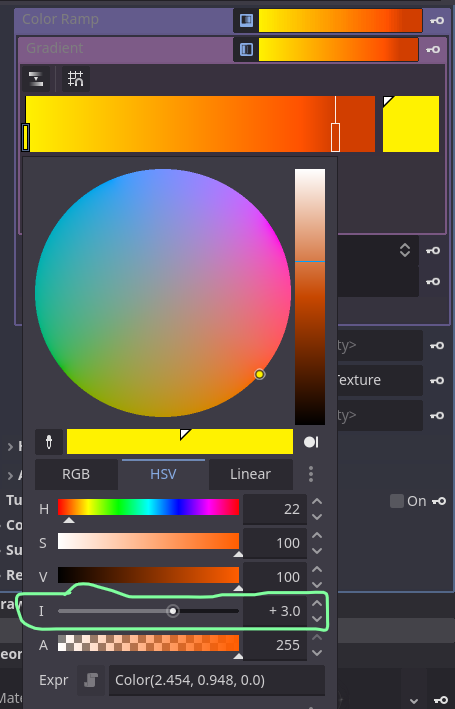
Notice how the color is actually Color(4, 0.8, 1, 1)? There’s more info on that red channel than the maximum of 1, this is because we want to make the character glow on hit. For that we need two things, an Environment with Bloom enabled, and some HDR colors with channels going past 1.0. HDR Colors have different behaviors between Compatibility and Forward+ renderers when changing them from an editor dialogue (like exports):
- Compatibility: Color channels vary from 0 to 255, but there’s also an (I)ntensity bar at the bottom. Take that past 1 to make your color glow. If editing gradients you might need to check Enable HDR.
- Forward+: Color channels usually cap at 1.0, but if you suport HDR they can go beyond it.
We’ll use these glowy colors later on for more effects.
I also have a Knockback script. I’m not very keen on it yet, it’s buggy, but the general idea is:
- first, hold some
knockback_velocityvalue which decreases every frame -
apply_knockbackwill modify that velocity from hit data from your attack - a) on physics frame, store the character’s velocity in a temp value
- b) then
move_and_collidethem with your knockback velocity - c) restore the character’s old velocity This is good because it doesn’t interrupt other scripts directly modifying velocity like pathfinding or state machines. It’s not great because I have no idea how to handle gravity yet, but for a 2D plane it’s pretty good.
Finally, there’s Screen Shake. I didn’t expect it to be that controversial on the comments on X.com and Reddit, I thought it was too light. I had a lot of trouble balancing both the shake strength and shake decay to match the original, as from earlier attempts in other games I don’t have a good sense for the shake numbers
I like it, especially if you can sell stronger hits with stronger shake. The helpful Reddit comments did remind me that shake, as well as flashing, should likely be a toggle on the settings screen, so keep that in mind. If you can find an implementation of “hit-stop” it would fit here as well.
My shake script comes from this video by TheShaggyDev. I think it could be improved but I’m not sure how, and so far it works so I haven’t changed it. I can access the current camera wherever with <node>.get_viewport().get_camera_3d() and trigger the shake from there, or from a static function that finds the shake object for me.
The pushback animation isn’t all, though, the video also adds particles to the hit, so I tried to copy those as well.
Particles
Particles when hitting enemies are actually spawned by the sword, when the hitbox finds a hurtbox. In my head, different swords have different visuals for the hit. In your game different enemies might have different blood splatters though, so make sure to spawn those alongside their knockback animation.
The original video has both orange sparks and a white flash. I didn’t like the white flash so I swapped it for an impact circle ala Kingdom Hearts.
I basically copied the settings in these videos to make my particles. The first is a Godot tutorial, the second is a Unity tutorial, still useful for breaking down the particle into its effects and characteristics.
I’m using textures from Kenney’s particle texture pack. I think the humble “circle_05” that’s just a filled in circle with feathered edges is the most versatile texture there is, from dust to sparks to flares it can do a lot. Either way I’m still pretty bad at setting up the process materials for particles so having a reference to copy helps me a lot.
Sword Trail
To make the trails I used the very nice GPUTrail3D plugin by celyk. Here’s two helpful videos about it. I followed the first one but the second is pretty good too.
What I found a bit unorthodox is that, to remove the trail, you need to set the length to 1 manually. Making it invisible is not enough: if you don’t reset the length at frame 1 of your animation the trail might continue from the last attack to the new one, which you might actually want to do!
I’m a big fan of how the untextured trail looks but I ended up using a blurred texture to make it a bit more fantastical. Like the particles and hit flash before, this one also uses HDR colors so the environment makes it glow.
Audio
I don’t have many tips to give, but Audio is still very important for polishing. All four sound effects used on my video were taken from freesound.org, and used Audacity to cut them up and sometimes EQ them.
Godot’s AudioStreamPlayers would work just fine here, but I have an AudioManager autoload because I like that abstraction better from working on RPGMaker games a lot. It creates streamplayers at runtime from .play_sfx calls I schedule, then frees them up. I can’t find the video I used as inspiration, sorry, but there’s plenty of examples and ready-made scripts online.
# Enemy
func on_hit() -> void:
    animate_hit()
    spawn_hit_particle()
    SoundManager.play_sfx("enemy_hit.wav")
I also like to vary the pitch of specific repetitive sounds like the slashes. Just change the pitch_scale of the stream player every time you play it to a random number around 1.0, like between 0.8-1.2, and it should work. I recommend making a class extending player that does this when calling play(), then call the superclass function.
When possible, try to avoid purely synthesized sounds like the ones from BFXR / SFXR. They don’t quite fit games that look 16-bit and beyond, and can sometimes be uncomfortable on the ears. You can still bitcrush hi-res sound effects if you need the aesthetic. I’m not your mom, though. Even I fall back on them here and there for a jam or something.
Kinda unrelated but I recommend exporting to .ogg instead of .wav for larger projects because .ogg files are more compressed.
Miscelaneous
Some other things I didn’t mention or wanna recap.
The WorldEnvironment node has Bloom active, so even in Compatibility renderer we get some nice shiny lights and particles. If you need to test how your particles look in the editor you can paste that environment in the particle scene temporarily.
I added a simple vignette shader to a ColorRect on a CanvasLayer. I think it helps make the 3D game feel more together. Some 2D games like Hollow Knight also use it pretty well.
Player movement is snappy and animations are quick, I could’ve made them even quicker. The objective isn’t to make swings realistic, it’s to make them satisfying, it’s a game. You should also consider extending the hitbox far past the sword and use some VFX trick to indicate the new fantastical range, like the slashes in Hollow Knight, Wuthering Waves, Maid of Salvation.
Takeaways
This was fun! I’ve done some of these before, like the screenshake, but having a “recipe” to follow from André made it a fun exercise in the form of a checklist with kept me motivated.
I’ve seen at least two people, one I know, say they prefer the “un-juiced” version of Cardoso’s video, which is unthinkable to me. At the very least have the sword slash use easing as to replicate 2D animation or just feel more weighty. I also think any sort of feedback on the enemy is essential, be that the damage flash or the particles, or a change in animation. I can understand people saying it’s overkill though, it’s a matter of taste and the fantasy the individual game wants to provide.
Finally, I think polish alone can make a good toy but not a good game. Lots of my prototypes are toys, fun things and concepts you play with, like rolling dice to move pieces, smacking enemies, betting on random cards etc. Polishing these experiences can make the act of play more fun. Games, though, need a bit more. Some kind of appeal or fantasy that will guide the visual direction, and some sort of either depth or progression that gets players to engage with the game for multiple hours.
Even if I don’t make games people want to play for whatever reason, lack of game direction or art direction, lack of provoking messages etc, what I learned this week will probably help me make more fun digital toys that go past simple mechanics prototypes.
I hope this post was helpful for you too! Good luck!
Links
- André’s post on the 3 projects, Bluesky
- My method for Hitboxes in Godot, by Queble
- AAA combat interactions for your Godot game, by FairFight
- How I do screen shake in Godot, by The Shaggy Dev
- Kenney’s particle texture pack
- GODOT 4 - Hit and Impact Effects, by Le Lu
- VFX Breakdown: Ultima Weapon Hit/Strike, by Mirza
- GPUTrail3D plugin by celyk on Github
- GODOT 4 - TRAIL EFFECT 3D, by Le Lu
- Creating Trail Effect With GPUTrail - Godot 4.3, by Four Games